You are using an out of date browser. It may not display this or other websites correctly.
You should upgrade or use an alternative browser.
You should upgrade or use an alternative browser.
Custom PLAYSETS & DIORAMAS with your INDY TOYS!!
- Thread starter tnswman
- Start date
tnswman said:They are wrapping up the issue that my interview will be in ( Issue 4 ) so, now the editor has this info too")
Thanks for the plug, man...I really appreciate it. Even if it's not in the magazine, its great to have such positive feedback right here.
Goonie said:Here's something soloboy5607 posted to his Flickr page:
http://www.flickr.com/photos/28891766@N00/2608633695/
It would go good with glorbes' flying wing model.
That's a really sharp looking graphic...its a great match to the style of the actual packages.

inky_skin
Active member
Inspired by glorbes into upping my customising game, I've revisisted my rope bridge to add more detail, and I've also had a go at a mine car from ToD.
So, while glorbes (hereafter to be known as 'The Master') has shown us that bigger is better when it comes to vehicles, I hope you all appreciate that small can also be beautiful
<a href="http://s29.photobucket.com/albums/c273/inky_skin/?action=view¤t=rope_mine.jpg" target="_blank"><img src="http://i29.photobucket.com/albums/c273/inky_skin/rope_mine.jpg" border="0" alt="Photobucket"></a>
Track and mine environment to follow...
So, while glorbes (hereafter to be known as 'The Master'
) has shown us that bigger is better when it comes to vehicles, I hope you all appreciate that small can also be beautiful <a href="http://s29.photobucket.com/albums/c273/inky_skin/?action=view¤t=rope_mine.jpg" target="_blank"><img src="http://i29.photobucket.com/albums/c273/inky_skin/rope_mine.jpg" border="0" alt="Photobucket"></a>
Track and mine environment to follow...
Inky Skin, that mine cart is AMAZING!!!
The added detail to the bridge diorama really makes it pop...you've really upgraded an already great piece.
Back to the mine cart...you really have made a masterpiece of this. The cart is tight and cleanly constructed, and that paint job is spot-on perfect. It looks like the miniature model used by ILM (if not better). Your final product far surpasses anything that Hasbro could produce. Perfect scale too!
How did you end up approaching the paint job in the end? Did you start grey and weather from there, or did you do the reverse? Either way, it came out as a stunner.
Can't wait to see what you'll do with the track and environment.
inky_skin
Active member
Thanks glorbes - high praise indeed from the master customiser
I took your advice and went with a dark grey base coat. I then gave it a diluted black wash to give it some depth. Finished up with dry-brushing the rust colour to pick out the corners / details.
The most difficult part of the construction has been finding wheels compatible with 1:18 scale. 0 and 00 gauge railway parts are just too small (and unfortunately so is the track width - custom rails here we come !), so I had to take a slightly sideways look at the problem. Hence the wheels on my minecart are made from 21mm snap fasteners...
The rope bridge was looking a little flat originally - all I'd done was glue the slats to a piece of string. Therefore I went back, tied each slat to the string individually (tricky little 'cross' knot - easier when you've done a few) and added a couple of extra tangles of 'rope' to represent the collapsed handrails. Again, dry-brushing picked out the detail satisfactorily.
So - onto the mine environment. I'm pushed for space, so this'll only really extend to rails / a backdrop for the cart. I'm going to try and pack in as much detail as possible though. Anyone know where I can order 1:18 scale oildrums online ?
Stoo
Well-known member
That is EXCELLENT, inky_skin! Beautiful work. The rusty paint job looks perfect. I really love the water stains on the side of the car.inky_skin said:So, while glorbes (hereafter to be known as 'The Master'
(As an early teen I used to build dioramas with WW2 Tamiya kits and you guys are rekindling my passion for this type of thing.)
A photo of carded figures on a shelf is one thing. Diorama? That's something else...Can't wait to see more!

inky_skin said:the wheels on my minecart are made from 21mm snap fasteners...
Wow...that is absolutely brilliant! Very creative solution.
RichardJones
New member
great mine cart inky_skin, cant wait to see your track and mine environment you guys have raise the bar. I am only skilled enough to do
environments, temple etc... I do want to try and step up to making vehicles. But I have alot to learn.
you guys have raise the bar. I am only skilled enough to do environments, temple etc... I do want to try and step up to making vehicles. But I have alot to learn.
inky_skin
Active member
RichardJones said:I do want to try and step up to making vehicles. But I have alot to learn.
Richard - I don't presume to be an expert, but this is the forum if you have any questions on scratch-build creations. I'd be happy to make suggestions on any projects you have. I'm sure that goes for the other contributors on here as well...
Hmmm - the other thing is, anyone get an idea whether Willie's legs are articulated and her plastic skirt is removable without damaging the figure ? Otherwise getting her to sit in that cart is going to be a real problem
Oh - and if anyone knows how to do some basic wiring of a string of LEDs to a battery box, please PM me.
glorbes - let me know how the magazine thing works out. It'd be great if they could do a regular "custom-corner" (I'd love to get in on the action). In fact, on the next Hasbro Indy Q&A I might even direct their attention to all the great work in this thread.
Last edited:
RichardJones
New member
inky_skin said:Richard - I don't presume to be an expert, but this is the forum if you have any questions on scratch-build creations. I'd be happy to make suggestions on any projects you have. I'm sure that goes for the other contributors on here as well...
Hmmm - the other thing is, anyone get an idea whether Willie's legs are articulated and her plastic skirt is removable without damaging the figure ? Otherwise getting her to sit in that cart is going to be a real problem
Oh - and if anyone knows how to do some basic wiring of a string of LEDs to a battery box, please PM me.
glorbes - let me know how the magazine thing works out. It'd be great if they could do a regular "custom-corner" (I'd love to get in on the action). In fact, on the next Hasbro Indy Q&A I might even direct their attention to all the great work in this thread.
Thanks man I may do that.
RichardJones
New member
Some updated pics of my cemetary diorama
First pic
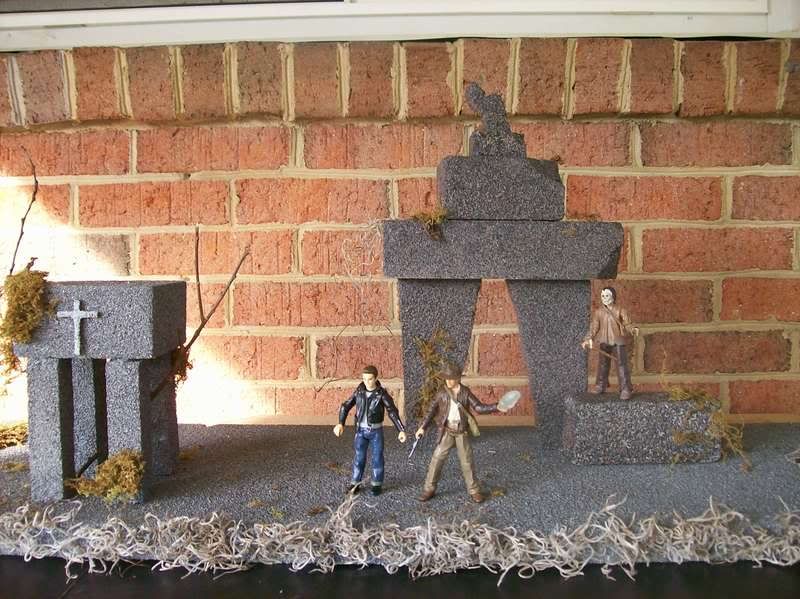
And few additions
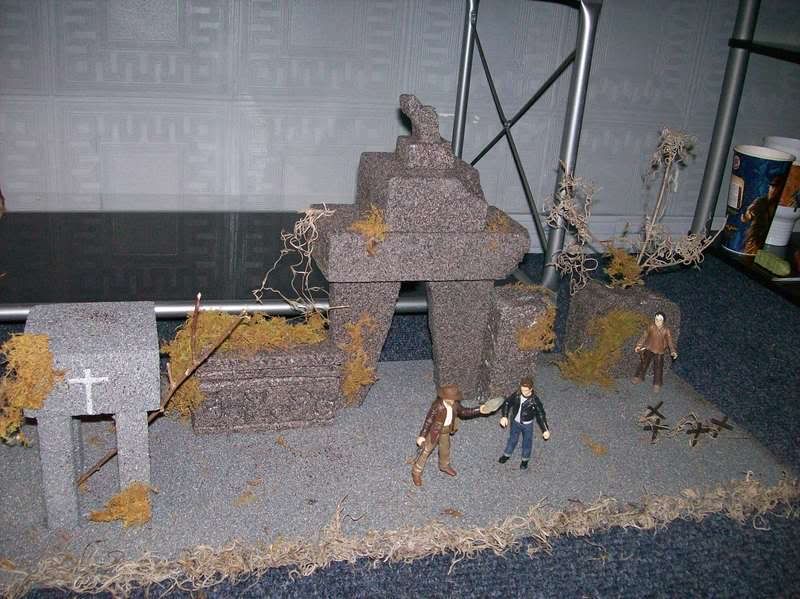
Still working on this...
First pic
And few additions
Still working on this...
inky_skin
Active member
Okay, so I've been waiting for parts to arrive in order to complete my minecart diorama - and I've been itching to do something to fill the time.
A lot of you (and me as well) have noted how cool an alter from the Temple of Doom would be. So, with a little planning I decided to see if I could fit electronics inside a dio to push it that bit further. No word of a lie - this is probably the most complex and challenging build I've done - but in the end, I'm really happy with the result.
Kali mar...
<a href="http://s29.photobucket.com/albums/c273/inky_skin/?action=view¤t=kali_mar.jpg" target="_blank"><img src="http://i29.photobucket.com/albums/c273/inky_skin/kali_mar.jpg" border="0" alt="Photobucket"></a>
First off, Inky...that Stone Altar is brilliant. What sort of material did you use for the base? What did you use for the skeleton and snake decoration? And a big YES to a tutorial on how you added lights to this thing. Good job on the paint, man...you've seriously upped your game on these mini-dioramas, and the effort is paying off big time.
Again, amazing work.
Again, amazing work.
inky_skin
Active member
glorbes thanks, man. It breaks down like this; base is a balsa wood construct, with a little fine surface filler for texture. The whole thing is hollow to take the battery holder and wiring / switch / connector block. The skull is a halloween party favor - fortunately also hollow to accomodate the LEDs. The two elements are bound together with air-drying clay. The snake is from the "Temple Swing" Deluxe Indy figure (actually it's two spliced together for length). Once assembled, I had a load of fun painting / weathering.
<a href="http://s29.photobucket.com/albums/c273/inky_skin/?action=view¤t=back.jpg" target="_blank"><img src="http://i29.photobucket.com/albums/c273/inky_skin/back.jpg" border="0" alt="Photobucket"></a>
Hopefully, you can see from the above pic that the electronic components are minimal (cost me less than £8 / $16). I used the following as a guide http://www.newrailwaymodellers.co.uk/Signal.htm- but I'd be happy to answer specific questions.
The last thing I have to do is make some compartment covers to hide everything at the back - oh, and make the rest of the Temple to go with it
ChromiumBlue37
New member
inky_skin said:Okay, so I've been waiting for parts to arrive in order to complete my minecart diorama - and I've been itching to do something to fill the time.
A lot of you (and me as well) have noted how cool an alter from the Temple of Doom would be. So, with a little planning I decided to see if I could fit electronics inside a dio to push it that bit further. No word of a lie - this is probably the most complex and challenging build I've done - but in the end, I'm really happy with the result.
Kali mar...
<a href="http://s29.photobucket.com/albums/c273/inky_skin/?action=view¤t=kali_mar.jpg" target="_blank"><img src="http://i29.photobucket.com/albums/c273/inky_skin/kali_mar.jpg" border="0" alt="Photobucket"></a>
Phenomenal work! Very crptic and cool.
This is what I am hoping Hasbro is doing for the TOD Sankara Stones item planned for 2009. Light-up electronics would be very cool as well as a trap door. I can see the pack in figure being either Indy or a Temple Priest.