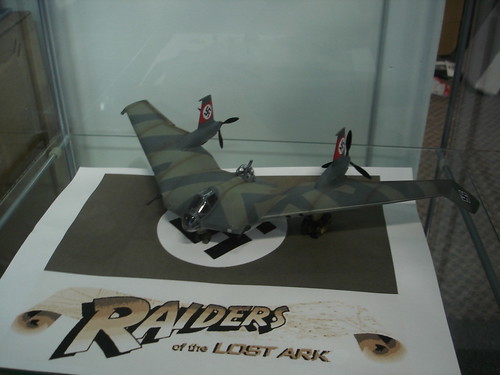
BV-38 Flying Wing
The History Channel Show "Mail Call" with R Lee Ermey devotes a segment of the show to the flying wing...put it on your DVR!
Black Sun Models : BV-38 Flying Wing
Available from Starship Modeler
MISCELLANY
Kit # BS-BV38
Scale: 1:72
Pattern Maker: Thorsten Dreisel
Caster: Blap! Models
Produced: December 2007
Indy: "They're gonna fly it out of here. When that ark gets loaded we'll already be on that plane."
So begins one of the most harrowing fight sequences in cinematic history as Indy goes fist-to-fist with nazis while dodging the spinning propellers of an out-of-control flying wing and we are introduced to one of the most unique contrivances devised for the screen, the nazi flying wing.
The fictional flying wing prototype was designed by concept artist Ron Cobb who is listed as one of the production artists (although in the bonus material disc of the Indiana Jones box set, the design of the wing was attributed to Raiders of the Lost Ark Production Designer, Norman Reynolds). The inspiration for the wing was not from the many advanced tailess designs of the nazi plane designers like the Horton bros. but by an american flying wing prototype from the 1940s (although it was never mentioned, but I'm guessing the specific inspiration may have been one of Jack Northrop's early flying wing designs). The full-sized model was built by the Vickers Aircraft Company and shipped in pieces to the set in Tunisia where it was assembled on set. Although the action was all between Indy and the big nazi goon, the centerpiece of the sequence was the flying wing!
This model kit is cast in 50 grey resin parts with 8 vacuformed clear parts for the canopy (4 required, with one extra set), water-slide decals, instruction sheet with painting and decal placement guide. There is one pilot figure and landing gear but no base or stand included.
The cockpit parts are nicely done, with a good amount of detail. The plastic seems different than what was used to cast the main body and other detail parts. The interior parts are a slightly darker grey and quite flexible but the detail is very sharp.
The landing gear parts are quite impressive. The heavy strut, wheel truck and wheels seem overbuilt for the plane, but look quite accurate to the physical model seen onscreen.
The engine parts are also very well done. The exhaust pipes are tiny but well cast. All the parts were mostly bubble-free--there's one bubble on the tip of one of the spinners.
The fuselage is incredibly well done. It is a substantial, solid casting with a wing span of over 12 inches.
A hallmark of Blap! Models is clean, bubble-free castings with hair-thin seam lines. The castings for the BV-38 are no exception. Mr. Dreisel's immaculate pattern work is well represented here with very fine, even engraved panel lines and other surface detail.
The underside of the fuselage is just as impressive as the top. In this view you can see the molded-in detail of the engine nacelle and the delicate panel lines throughout. The slots are for the exhaust pipes, intake vent and landing gear strut. These parts are all accurately keyed for a nice positive fit. There's no guessing where things go here!
Just visible are the anti-skid strips framed by the tub for the tailgunner turret, the access tunnel hump and the wing.
The wings feature sharply rendered control surfaces, panel lines and access panels.
I've left off the seat in this picture to show off the back wall and floor of the cockpit. There's stowage space behind the seat and the door leading to the tailgunner's turret.
The headlight frames seem a bit exaggerated compared to the full-scale mock-up. These could be sanded down a bit for a more realistic look. Or the more ambitious modeler can carve them out altogether and rebuild the headlamps completely.
The air intake scoops just above them are a little soft and chunky too. These can be reshaped easily with a hobby knife and file.
The pilot's seat looks thicker and flatter than what can be seen onscreen. Not a problem if you're using the pilot, but I think I might be rebuilding the seat with a more curved, thinner back using some thin sheet styrene and raiding the photo-etch pile for some in-scale seat belts
The instrument panels are nicely done. After painting, a bit of clear epoxy in each bezel ought to give them a good, realistic look. The rudder pedals are kind of thick and plain though, and there's no throttle quadrant so maybe I'll be back to the photo-etch stash for those as well. The cockpit walls are devoid of detail. Although there's not much room there, a bit of wire and silver solder will busy it up.
The very chunky landing gear accounts for 20 of the 50 parts in this kit. They are well cast with good detail. The top of the truck is one of the few places I found a bubble. Not a big deal visually as that part is seated into the bottom of the strut when assembled but I'm wondering if this isn't going to be a weak point in the model. The gear truck is made of the same darker grey plastic the cockpit interior is made of and is quick flexible but easily broken off. I may reinforce the gear by pinning the truck to the strut with a length of brass rod. Also, there can be seen brake lines and wiring running from the struts down to the trucks. Annealed speaker wire can be used to add this detail to the model.
4 clear vacuformed parts make up the canopy and tail-gunnner's turret. A thoughtful inclusion are cast resin bucks to support the canopy parts when trimming and polishing. There's also a back-up set of parts in case the knife slips!
The pilot figure looks okay, though a bit stiff. Detail on it looks soft as well, but I think it should paint up nicely. The cockpit is so nice and there's enough canopy to really show off the inside that I may just lay this guy to one side so he won't block the view.
Giant 7 foot tall quarter not included. : )
Black Sun Models BV-38 is one of the best engineered and well executed garage kit I've seen in a long time, with fine detail, delicate panel scribing and well considered parts breakdown. The pattern maker designed this kit to be as trouble-free as possible and the casting is nearly flawless. As a garage kit hobbyist, I think I can easily be spoiled by the quality of the production and service. This is state-of-the-art as far as garage kits go; a far cry from the bubbly, sticky approximations that was common to the craft only a few years ago.
A couple of notes to the instruction sheet: In step 3, the builder is directed to attach the engine exhausts (parts # 21) on the inboard side of each nacelle, curling down and in. I've done a frame-by-frame review of the entire sequence and it's clear in several shots that the exhaust pipes curl out. Also, in the shot where the planes wing tip tears open the fuel truck, I can clearly see the underside of the wing is marked with a cross, not a swastika. So in regards to the Decals portion of the instruction sheet, use the swastikas on the tops of the wings and use the crosses beneath.
It only took 27 years for a decent sized model of this unique and memorable movie vehicle to become a model kit. Now, if only someone were to make one in styrene, maybe in 1/32 or even 1/24?
Moderator's Note: The above text comes from this site. Cite your sources next time, if you're going to quote verbatim.
")