I made this tutorial to show that the Hasbro figures while flawed, can really shine with a little effort put forth. I also directed this towards those who may never have attempted any customizations in the past, so some terms that are second nature to those already familiar with the process, may seem over explained.
So, you really want the 12" scale mail-away Ark, but you think the Hasbro figures suck, right? And you don't want to steal the stickers, right?! Well, with a little bit of work, you'll be half way home to getting one and have a fairly decent 12" scale Indy to display until your Sideshow version ships in the fall.
What you'll need:
1 Indiana Jones Talking figure
1 Indiana Jones Whipping Action figure
1 Sheet of fine 800-1000 grit sand paper
1 old terry cloth towel or polo shirt (something rougher than a t-shirt)
1 fine sanding pad or stick (available at most hobby shops)
A paint brush and some paints. (black/brown/white/yellow)
2 paper clips
Small screwdriver
Xacto knife
Jacket from Talking Indy
Shoes From Talking Indy
Belt from either
Holster from either
Coiled whip from Talking Indy
Shirt from Talking Indy
Pants from either
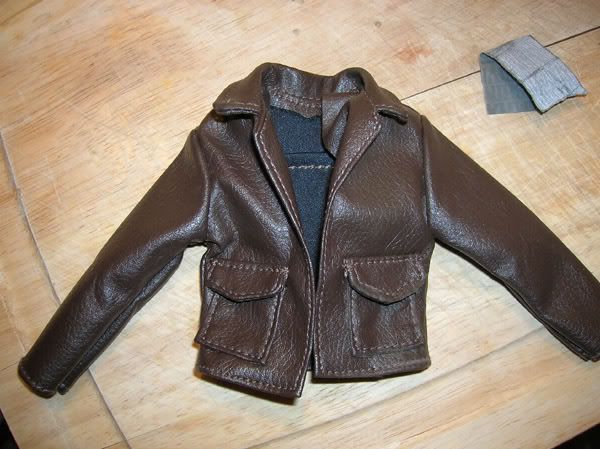
First thing you want to do is take the jacket off your Talking Indy. What you want to do here is take out some of the stiffness that's only natural with new vinyl. Since you can't wear it, you'll have to carry it, scrunch it, throw it, twist it, step on it, whatever it takes to wear it in a bit. This may sound odd, but I actually folded it up and crammed it in my back pocket for the day while at work. Make sure to take it out every now and again and fold it over in a different direction. You can even work the fabric with your fingers for a while whenever you get the chance. The softer the better. This will make all the difference in the end. When clothing in this scale looks stiff or doesn't drape off the figure properly, it's going to look like cheap.
When you get home it's time to grab the sand paper and sticks. First thing you want to do is lightly sand the surface of the jacket with the 800-1000 grit sand paper. This will alleviate some of the gloss and make the "leather" more pliable. It will also allow the paints to adhere to the fabric better. When you're done with that, take the sand pad/stick and rub it briskly over the areas of the jacket that are raised. This would include all edges of the waist, collar, cuffs, and pockets. Basically anywhere that would become worn first on a real leather jacket. Be careful not to sand too hard or you may wind up sanding down to the black material on the reverse side of the pleather. Also be mindful during this process. You don't want to rip through the material or fray any of the stitching to the point where the seems could come undone.
You can see the difference here. The right side has been sanded.
When that's done it's time to start painting. Fill a bowl with water and mix your paints. You want to come up with a "muddy color" something inbetween a dark tan and light browninsh yellow. Something like this:
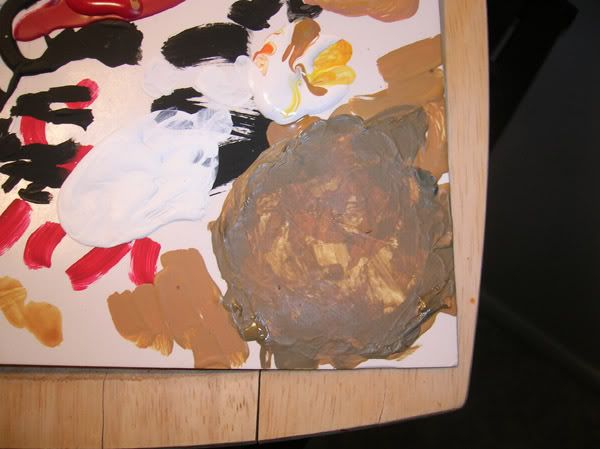
You're going to apply what's called a wash over the flat surfaces of the jacket. Wet the brush and dip it into the paint. You want the paint to be very thin. similar to water colors. Now with jacket in hand and that old towel near by, begin to lightly move the brush over the surface. Quickly wipe the area dry with the towel. I would suggest doing a color test first on the inside lapel. This way you can judge whether or not your colors are correct or if your paint is too thick/thin. If it looks like you painted it (ie brush strokes are showing), it's too thick. If it looks like nothing has changed, then your paint is too thin. Too thin is obviously better that too thick. You can always go over the area again. In fact I would suggest a few coats to get the optimal effect.
When you're happy with the results, it's time to move on to the egdes you sanded with the sticks. You're basically doing the same thing only this time you can use a slightly thicker paint mixture. Gently glide the brush over the ditressed areas and wipe it away. You'll begin to see that the ditressing you did earlier will pick the paint up much easier than the sleaves and back.
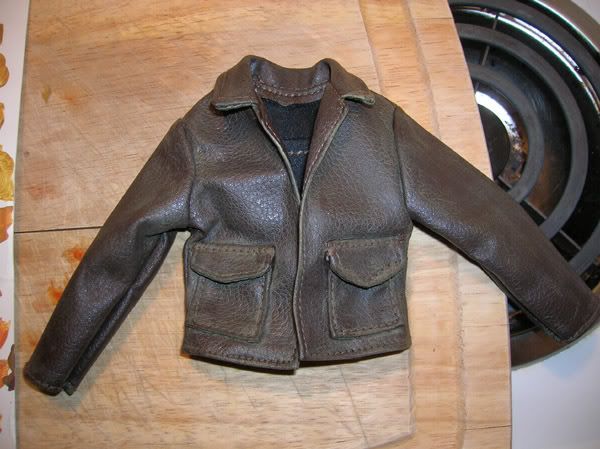
Once the weathering is completed. Go back and check your work. If you're happy with it, it's time to move onto the next step. If you feel it's not "worn in" enough, go back and repeat the process. If you applied too much paint. Wet your towel and rub the area in a circular motion. If you haven't gone too overboard, the paint should gradually fade.
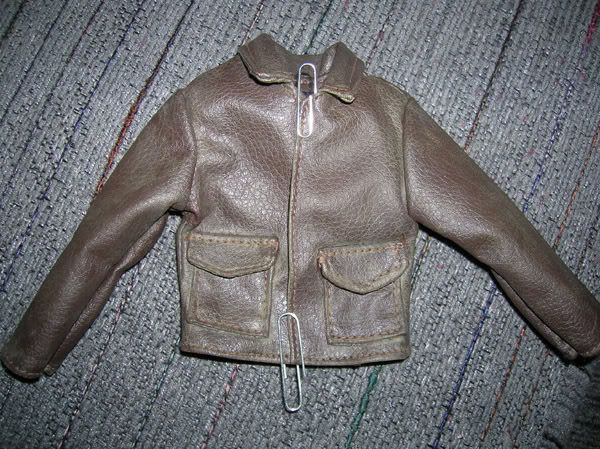
What you're looking for is something like this:
Now hold the jacket in font of you and close it like in the photo below. Close a heavy book over it and stick it under something. Like the couch.
What you're trying to acheive here is to break in the stiffness of the colar so that it draps over the shoulders more naturally. Leave it there for a few hours or overnight.
Next up are the accessories. Shoes, belt, holster, whip, and eventually the hat. Set up your paints again. This time you're going to do something called "dry brushing" it's pretty much the opposite of the "wash" we did for the jacket. Again, mix your paints. Try to get the same "mud" and leave some extra black and white to the side of the pallet. Dip your brush in the paints, but this time instead of thinning it with water, you want to rub your brush on the towl or dry section of palet until you remove virtually ALL of the paint.
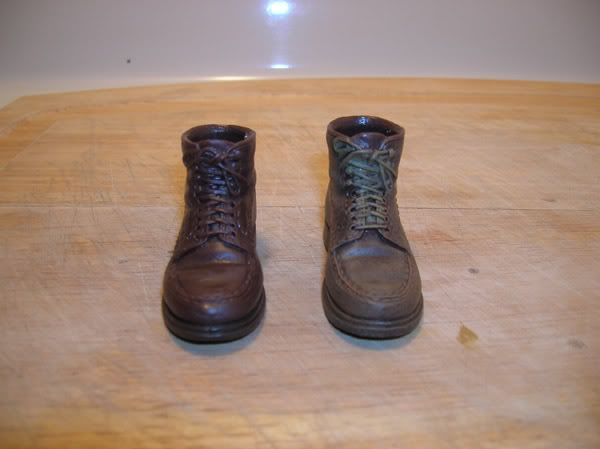
Let's start with the shoes. I'm using the ones from the Talking Indy as they are already molded in a darker brown plastic. You then want to take this dry brush and rub it over the surface of the part you're working on. Focus on the laces and stitching fist. This will make the sculpt POP and look much more realistic than the shiney plastic you're leaving behind.
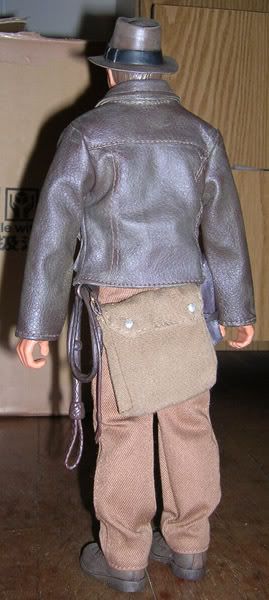
Repeat the process with the rest of the parts. Mix it up little though with different shades of browns and blacks. You don't want everything to look like the same leather. I went with a darker wash over the holster and just straight black over the belt and whip.
Note: Drybrushing takes some practice so you may want to do some testing on an older action figure. Don't forget, even if you mess up, you do have an extra of everything needed from the talking Indy figure. You shouldn't have too hard a time though. Making something look older is infinitly easier and fool proof that attempting to make an older piece look new again.
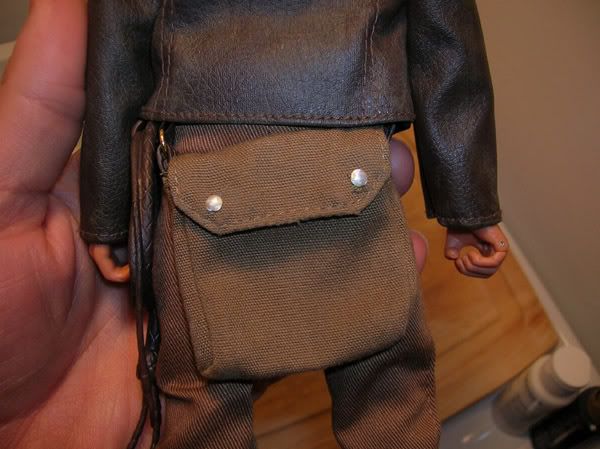
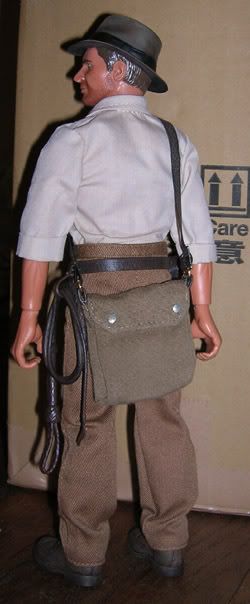
Next you want to work on the bag. Grab your sand paper/sticks/pad and just go over it making sure to focus on the edges. Indy would never carry around a new bag, right? So make it look the part. This peice is really well made and quite sturdy, so don't be afraid to get a bit aggressive, but don't go too nuts or you may end up ripping it. I also went over the gold details in the snaps as well with the fine sand paper to dull the shine a bit.
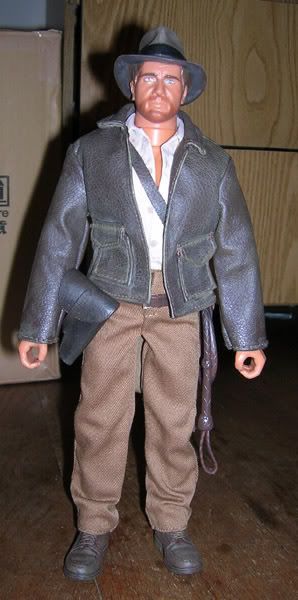
Assmuning a few hours have passed get your jacket out of the book. Take the two paper clips and clip them onto the jacket as shown. This will help to avoid the lapels from opening up too wide over Indy's chest when adorned.
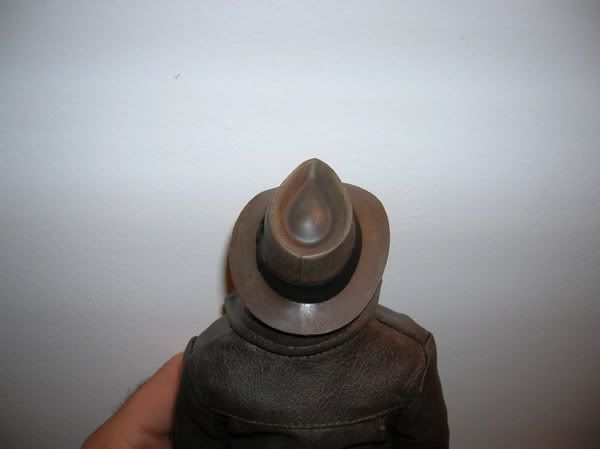
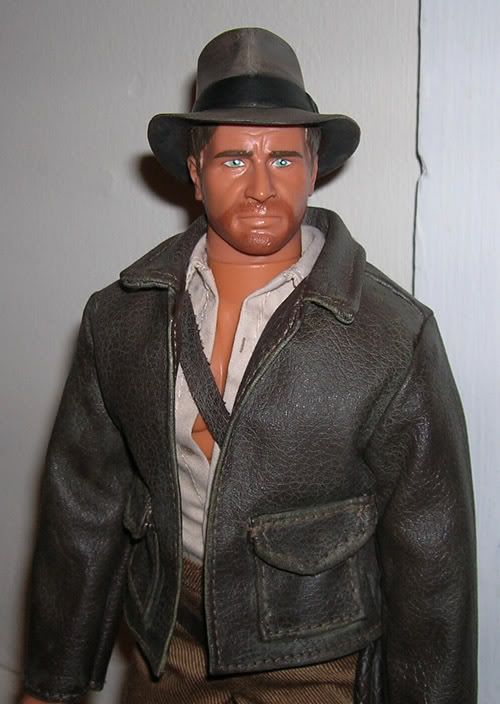
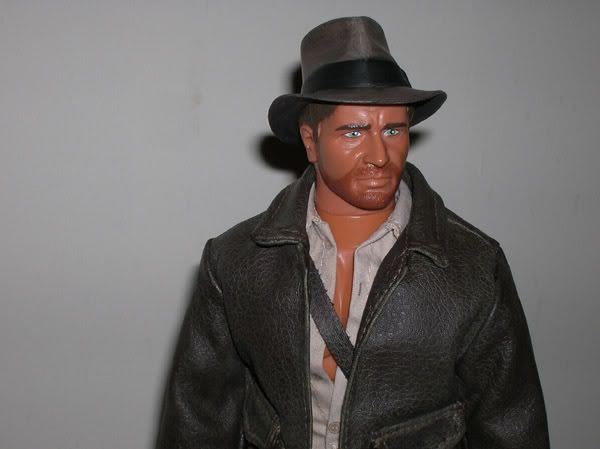
Now on to the hat. Drybrushing again. Repeath the the above steps you used for the accessories. Use your "mud" color as a first coat. Now paint the hat band black. You can either go with a straight up mixture of paint if you feel confident or gently drybrush with the tip until you cover the entire area. Using the drybrush method is easier as you'll be less prone to slop outside the lines. Finally do a VERY dry pass in black or grey over the entire peice. Pay attention to raised and recessed areas again. Raised should be lighter and recessed darker. Just like on real leather.
So, you really want the 12" scale mail-away Ark, but you think the Hasbro figures suck, right? And you don't want to steal the stickers, right?! Well, with a little bit of work, you'll be half way home to getting one and have a fairly decent 12" scale Indy to display until your Sideshow version ships in the fall.
What you'll need:
1 Indiana Jones Talking figure
1 Indiana Jones Whipping Action figure
1 Sheet of fine 800-1000 grit sand paper
1 old terry cloth towel or polo shirt (something rougher than a t-shirt)
1 fine sanding pad or stick (available at most hobby shops)
A paint brush and some paints. (black/brown/white/yellow)
2 paper clips
Small screwdriver
Xacto knife
Jacket from Talking Indy
Shoes From Talking Indy
Belt from either
Holster from either
Coiled whip from Talking Indy
Shirt from Talking Indy
Pants from either
First thing you want to do is take the jacket off your Talking Indy. What you want to do here is take out some of the stiffness that's only natural with new vinyl. Since you can't wear it, you'll have to carry it, scrunch it, throw it, twist it, step on it, whatever it takes to wear it in a bit. This may sound odd, but I actually folded it up and crammed it in my back pocket for the day while at work. Make sure to take it out every now and again and fold it over in a different direction. You can even work the fabric with your fingers for a while whenever you get the chance. The softer the better. This will make all the difference in the end. When clothing in this scale looks stiff or doesn't drape off the figure properly, it's going to look like cheap.
When you get home it's time to grab the sand paper and sticks. First thing you want to do is lightly sand the surface of the jacket with the 800-1000 grit sand paper. This will alleviate some of the gloss and make the "leather" more pliable. It will also allow the paints to adhere to the fabric better. When you're done with that, take the sand pad/stick and rub it briskly over the areas of the jacket that are raised. This would include all edges of the waist, collar, cuffs, and pockets. Basically anywhere that would become worn first on a real leather jacket. Be careful not to sand too hard or you may wind up sanding down to the black material on the reverse side of the pleather. Also be mindful during this process. You don't want to rip through the material or fray any of the stitching to the point where the seems could come undone.
You can see the difference here. The right side has been sanded.
When that's done it's time to start painting. Fill a bowl with water and mix your paints. You want to come up with a "muddy color" something inbetween a dark tan and light browninsh yellow. Something like this:
You're going to apply what's called a wash over the flat surfaces of the jacket. Wet the brush and dip it into the paint. You want the paint to be very thin. similar to water colors. Now with jacket in hand and that old towel near by, begin to lightly move the brush over the surface. Quickly wipe the area dry with the towel. I would suggest doing a color test first on the inside lapel. This way you can judge whether or not your colors are correct or if your paint is too thick/thin. If it looks like you painted it (ie brush strokes are showing), it's too thick. If it looks like nothing has changed, then your paint is too thin. Too thin is obviously better that too thick. You can always go over the area again. In fact I would suggest a few coats to get the optimal effect.
When you're happy with the results, it's time to move on to the egdes you sanded with the sticks. You're basically doing the same thing only this time you can use a slightly thicker paint mixture. Gently glide the brush over the ditressed areas and wipe it away. You'll begin to see that the ditressing you did earlier will pick the paint up much easier than the sleaves and back.
Once the weathering is completed. Go back and check your work. If you're happy with it, it's time to move onto the next step. If you feel it's not "worn in" enough, go back and repeat the process. If you applied too much paint. Wet your towel and rub the area in a circular motion. If you haven't gone too overboard, the paint should gradually fade.
What you're looking for is something like this:
Now hold the jacket in font of you and close it like in the photo below. Close a heavy book over it and stick it under something. Like the couch.
What you're trying to acheive here is to break in the stiffness of the colar so that it draps over the shoulders more naturally. Leave it there for a few hours or overnight.
Next up are the accessories. Shoes, belt, holster, whip, and eventually the hat. Set up your paints again. This time you're going to do something called "dry brushing" it's pretty much the opposite of the "wash" we did for the jacket. Again, mix your paints. Try to get the same "mud" and leave some extra black and white to the side of the pallet. Dip your brush in the paints, but this time instead of thinning it with water, you want to rub your brush on the towl or dry section of palet until you remove virtually ALL of the paint.
Let's start with the shoes. I'm using the ones from the Talking Indy as they are already molded in a darker brown plastic. You then want to take this dry brush and rub it over the surface of the part you're working on. Focus on the laces and stitching fist. This will make the sculpt POP and look much more realistic than the shiney plastic you're leaving behind.
Repeat the process with the rest of the parts. Mix it up little though with different shades of browns and blacks. You don't want everything to look like the same leather. I went with a darker wash over the holster and just straight black over the belt and whip.
Note: Drybrushing takes some practice so you may want to do some testing on an older action figure. Don't forget, even if you mess up, you do have an extra of everything needed from the talking Indy figure. You shouldn't have too hard a time though. Making something look older is infinitly easier and fool proof that attempting to make an older piece look new again.
Next you want to work on the bag. Grab your sand paper/sticks/pad and just go over it making sure to focus on the edges. Indy would never carry around a new bag, right? So make it look the part. This peice is really well made and quite sturdy, so don't be afraid to get a bit aggressive, but don't go too nuts or you may end up ripping it. I also went over the gold details in the snaps as well with the fine sand paper to dull the shine a bit.
Assmuning a few hours have passed get your jacket out of the book. Take the two paper clips and clip them onto the jacket as shown. This will help to avoid the lapels from opening up too wide over Indy's chest when adorned.
Now on to the hat. Drybrushing again. Repeath the the above steps you used for the accessories. Use your "mud" color as a first coat. Now paint the hat band black. You can either go with a straight up mixture of paint if you feel confident or gently drybrush with the tip until you cover the entire area. Using the drybrush method is easier as you'll be less prone to slop outside the lines. Finally do a VERY dry pass in black or grey over the entire peice. Pay attention to raised and recessed areas again. Raised should be lighter and recessed darker. Just like on real leather.

")
